How To Install an Onboard Boat Battery Charger on Your Boat
Owning a boat opens up a world of adventure. Whether you're navigating serene lakes or taking on the high seas, rely on a dependable battery system for a safe voyage.
This guide will show you how to install an onboard boat battery charger on your boat so you can enjoy a worry-free experience every time you're on the water.
The Importance of a Reliable Battery System on a Boat
When you're out on the water, your boat's battery is its lifeline. From powering navigation systems to running lights and other essential electronics, a reliable battery system ensures that everything on your boat functions as it should. A well-maintained battery system not only enhances the safety of your trips but also boosts your confidence to explore further.
Having a dependable battery system also means less time worrying about power issues and more time enjoying your boat. Whether you're a DIY enthusiast or just like being prepared, knowing how to maintain and install an onboard boat battery charger is invaluable to ensuring the battery remains charged throughout the trip.
What Is an Onboard Boat Battery Charger?
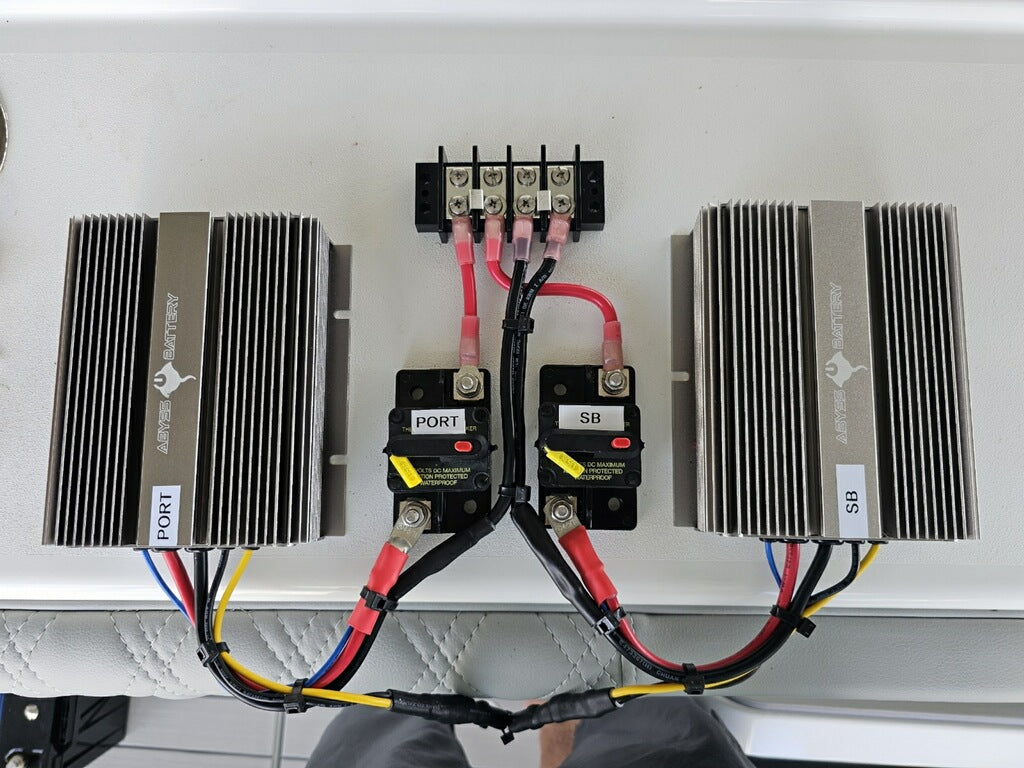
An onboard boat battery charger is a device that helps maintain and charge your boat's battery system. Unlike portable chargers, onboard chargers are permanently installed on your boat. They provide a convenient and efficient way to ensure your batteries are always charged and ready to go. These chargers are designed to handle the marine environment, offering protection against water, vibration, and corrosion.
Types of Onboard Battery Chargers
There are different types of onboard chargers, including single-bank and multi-bank chargers. Single-bank chargers are suitable for boats with one battery, while multi-bank chargers can charge multiple batteries simultaneously. Choosing the right type of charger depends on your boat's battery setup and your specific needs.
How They Work
Onboard battery chargers typically connect to shore power when your boat is docked. The charger then converts the AC power from the shore into DC power, which charges the batteries. This process ensures that your batteries are always at optimal charge levels, extending their life and reliability.
Choosing the Right Charger
Before you start the installation process, it's important to choose the right charger for your boat. Consider the type and number of batteries your boat has, as well as the charger's capacity and features.
Make sure to select a charger that matches the voltage of your boat's battery system. Most boats use 12-volt systems, but some may have 24-volt or 36-volt configurations. Additionally, check the charger's amperage rating. A higher amperage charger will charge your batteries faster, but it's crucial to ensure it's compatible with your battery's specifications.
Step-by-Step Guide to Installing an Onboard Boat Battery Charger
1. Safety Precautions
Safety is paramount when working with electrical systems. Before starting the installation, make sure to disconnect the boat's power sources. Wear protective gear, including gloves and safety glasses, to protect yourself from potential hazards.
Read the manufacturer's instructions thoroughly and ensure that you have all the necessary tools and materials. Having a clear understanding of the installation process will make the task smoother and safer. It's also a good idea to have a fire extinguisher nearby. While it's unlikely that anything will go wrong if you follow the instructions, it's always better to be prepared for any situation.
2. Locating the Ideal Mounting Space
The next step is to locate the ideal mounting space for your charger. Choose a spot that is easily accessible for maintenance but also protected from water and excessive heat. Common locations include engine compartments or storage lockers.
Ensure that there is adequate ventilation around the charger to prevent overheating. Use a mounting template, if provided, to mark the mounting holes. Drill the holes carefully, attach the charger using corrosion-resistant hardware, and secure the charger firmly to prevent it from moving due to vibrations. Double-check the positioning to ensure it complies with the manufacturer's recommendations and provides easy access for future maintenance.
3. Connecting to the Boat's Battery System
Once the charger is securely mounted, it's time to connect it to the boat's battery system. Start by connecting the charger's positive and negative leads to the corresponding terminals on the battery. Use marine-grade cables and connectors to ensure a secure and corrosion-resistant connection.
Double-check all connections to ensure they are secure. Follow the wiring diagram provided by the manufacturer to ensure the correct wiring sequence. Proper connections are crucial for the charger to function effectively and safely. Make sure the connections are tight and free from corrosion, and use terminal covers to protect them from accidental short circuits.
4. Testing the Charger
Now that the charger is installed and connected, the final step is to test it. Plug the charger into a shore power outlet and turn it on. Observe the charger's indicator lights to ensure it is functioning correctly.
Check the voltage of the batteries using a multimeter to confirm they are receiving a charge. Leave the charger running for a few hours, and periodically check the batteries to ensure they're charging properly. If you encounter any issues, refer to the troubleshooting section of the manufacturer's manual. Testing the charger ensures that everything is set up correctly and your batteries will be properly maintained.
5. Protecting the Charger
To ensure the longevity of your onboard charger, it's important to protect it from the marine environment. Regularly inspect the charger and its connections for signs of wear or corrosion. Clean any buildup with a soft brush and a mild cleaning solution.
Use protective covers or enclosures to shield the charger from direct exposure to water. Ensure that the ventilation openings are not obstructed to maintain proper airflow. Following these protective measures will help keep your charger in optimal condition, ensuring it continues to perform reliably for years to come.
Considerations for DIY Installation vs. Professional Help
Installing an onboard boat battery charger yourself can save you money, but it's important to consider the cost and time involved. DIY installation requires purchasing the charger, tools, and materials. It also requires a certain level of skill and confidence in working with electrical systems.
Professional installation, on the other hand, offers peace of mind and ensures the job is done correctly. While it comes at a higher cost, it can save you time and potential headaches. Weigh the pros and cons of each option based on your skill level and budget. Whether you choose to do it yourself or hire a professional, ensure that the installation is done correctly to avoid any issues down the line.
Enjoy the Benefits of a Reliable Battery System
Installing an onboard boat battery charger on your boat is a valuable project for anyone who's ever set sail. By following the steps outlined in this guide, you can simplify the installation and take advantage of a reliable battery system.
If you're looking for dependable onboard boat battery chargers, Abyss Battery is here to power your next adventure. See for yourself how our innovative battery solutions can improve your time on the water!

Leave a comment